MBJD Laser
  • Home
  • About
  • Recent Projects
  • Store
  • Reviews
  • FAQ
  • Contact
  • Blog

Laser Engraving on Wooden Urn

3/28/2017

0 Comments

 
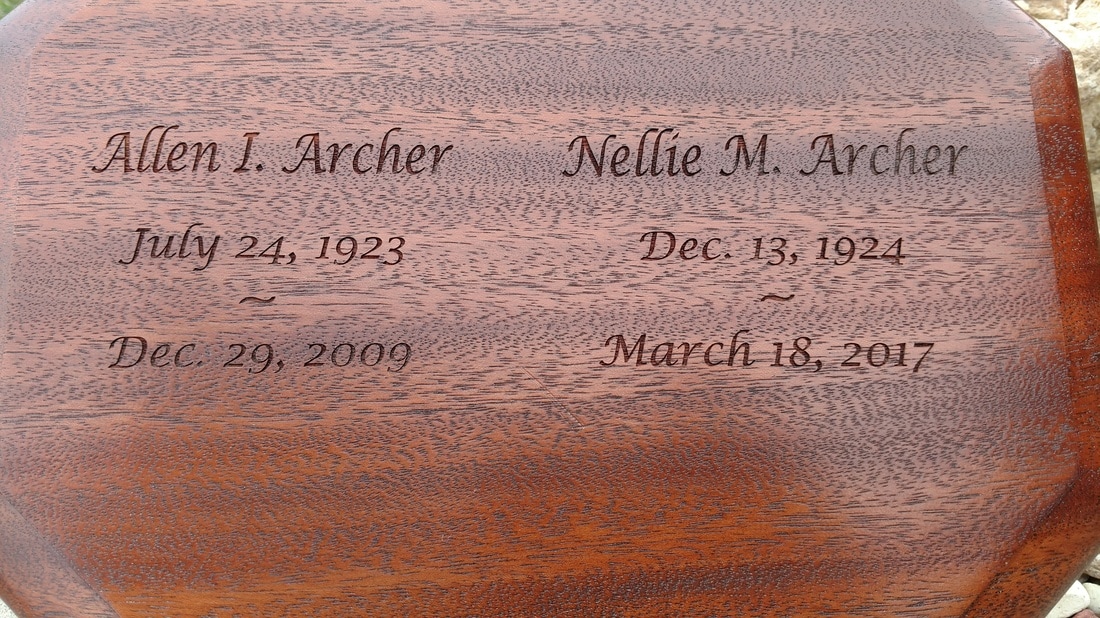
Today at MBJD Laser we got an opportunity to laser engrave onto an Urn for a customer.  As one can imagine doing jobs like these are both humbling and a bit stressful.  The customer who brought this project to us only needed the last date added to the urn.  Its amazing really how many times we get asked to finish a job or to match someone else's work.   It happens for a variety of reasons but in this case it was because the original engraver was no longer in business.

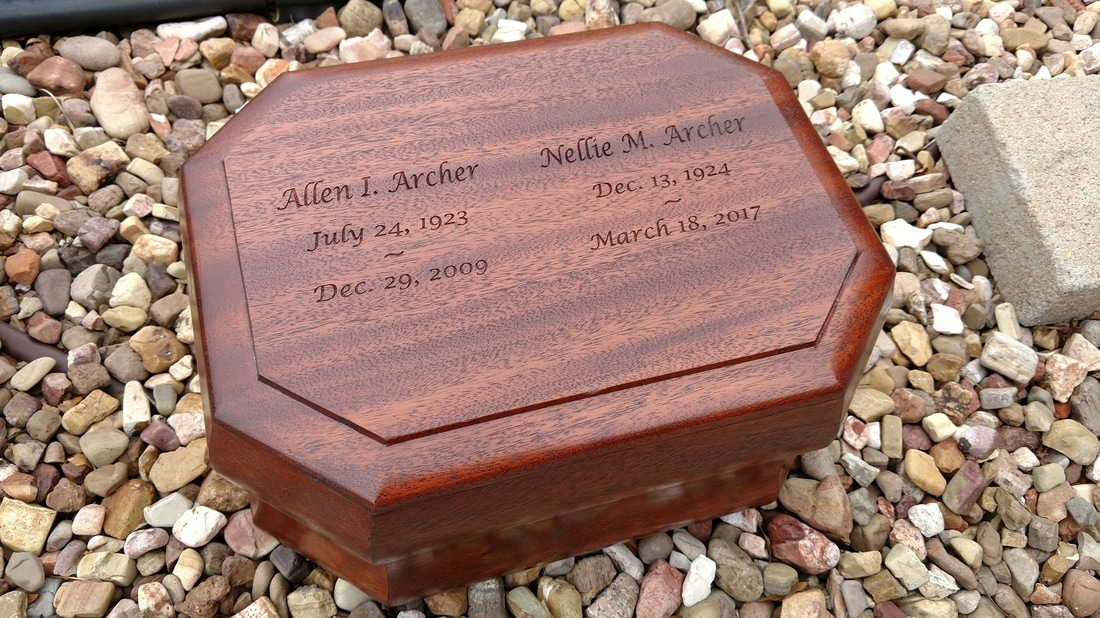
Size, and font are always a challenge to match exactly but overall on this job I think we did great work.  Understanding the kind of wood you are dealing with along with any stain or finish that is applied is very important.  Normally in a situation like this we will do a practice run on a scrap piece of wood to make sure the size and fonts will look as we are expecting. Because there is only one chance at something like this we take every precaution possible and double and triple check our measurements and spellings. Then once we are satisfied we will run it for real.  

It feels good to match and create something as special as this for our customers.

Picture
Picture
0 Comments

Picture Puzzle on Acrylic

3/27/2017

2 Comments

 
One of my favorite substrates to use is acrylic.  For one thing the variety of colors available is endless.  For another, it is very easy to raster and very easy to vector cut shapes.  Soon after I bought my laser I found that lasering pictures onto black acrylic looks amazing.  The quality of the photos are outstanding and most people really fall in love with the look because it is so unique.  

About a year ago I took one of my favorite picture of my son and I and I laser engraved it onto a black piece of acrylic.  Once i had the picture onto acrylic and to the size I prefered, I then vector cut it out like a puzzle.  I thought it would be fun to make my own puzzle with my own hand picked photograph.  Boy was I right it was a lot of fun to take apart and put together again.  It made for a great conversation piece.   To add a little color to the picture I laser cut a few different frames of acrylic to fit perfectly around that outside of the puzzle and it worked and looked great!

What we have found to work the best in displaying these puzzles is an easel because it allows you to display the puzzle with all the pieces without having to lay it down flat.

With our Epilog Zing Laser it is almost impossible to share with anyone the setting to raster the image onto the black plastic.  All images are slightly different and all I can say is trial and error and years of doing these images has been our best guidance.  What I will say however, the program PHOTOGRAV is outstanding.  Anyone wanting to laser photos onto a substrate needs this program.  Vector cutting is a different story.  The Speed we used to cut through 1/8" Acrylic was 24, the Power was 100, and the Frequency was 5000.

Other variations that one could do would be to use other shapes besides rectangle for the puzzle.  Heart shaped or oval shaped would look outstanding as well.

Picture
Picture
Picture
Picture
2 Comments

Personalizing Hand Tools with our Epilog Zing Laser

3/24/2017

0 Comments

 
Here at MBJD Laser I am always looking for unique and practical ways to use our laser.  Today I took the time to personalize some hand tools.   Personalizing anything not only looks good but it also acts as a theft deterrent.  Because most hand tools are made out of stainless steel the process is easy using Cermark.  I can see where Mechanic Shops, Tech Schools, and Trade Schools might find this handy to keep track of their valuable tools.

Stainless Steel Tools as well as tools with wooden handles would all be very easy to personalize.  


Picture
0 Comments

Laser Cut Playing Cards

3/22/2017

4 Comments

 
Once in a while here at MBJD Laser we get a chance to do some R&D.  (research and development).  We have been wanting to do some vector cutting on some fun substrates and it has always intrigued me to try and laser cut Bicycle Playing Cards.  Below are a couple picture examples of what we did.

Its interesting the things you learn along the way as well.  A few things to note:  A standard deck of playing cards measures 3 1/2" x 2 1/2".  There are 52 cards in a deck, or 54 if you count the 2 jokers.  Our Epilog Zing 40 Watt laser took on average about 40 seconds to laser cut each card.  In the examples shown we used Embassy Font.  A couple reasons we used embassy font is that it has proven to us to be a popular font, but more importantly the cursive style font connects all the letters together allowing the name to be held in place once the laser cuts it out.  As you can see in the photo we purposely attached the first and last letter to the frame of the card so that it would stay in place.  (We did have to use a little AutoCAD magic to create the full affect)  I'm sure our LXI sign software or Corel Draw could do the same thing.

We plan on offering custom laser cut decks of cards in our store soon.  These would make great table decorations, novelty gifts, or just fun unique gifts for that hard to shop for person.  They make great conversation pieces and fun room decor.
Picture
Picture
Picture
4 Comments

Unique Wooden Award

3/13/2017

0 Comments

 
This week we got the opportunity to make some wooden  medals/awards for a baseball tournament coming up this spring in Salina, KS.  The tournament coordinator called us and had an idea for a unique award and wanted to know if we could assist in making them.  After communicating back and forth via phone and email we decided on the wooden medals that you see below.  What makes them so special is that the baseball tournament is a "wood bat" tournament so in keeping with the wood theme we decided to use natural rustic wooden pieces and laser engrave them.

Many times when creating a custom piece for a customer, it is important to educate them on what the laser can do and what will look best.  It is also important to have suppliers and ideas about where you can obtain the substrates that you will use.  Helping control where the substrates come from lessons the chance for surprises.  After doing some research on the internet we ended up purchasing all of our wooden disks from Amazon.  The sizes were all very close in size but by no means were all exactly the same.   In this case they all measured between 2.5" and 3" in diameter.  One thing I was impressed with was that they all came sanded on both sides which helps get a consistent look with our laser.

With our Epilog Zing Laser we used a Speed of 80 and a Power of 100 to get these results.  On some of the medals we had to position the logo slightly off center so that we could also get the .125" hole at the top to accept a metal ring for a ribbon.  All in all a unique gift that looks great, and something all the recipients will remember for a long time.

Picture
0 Comments

Lasering on Glass Bottles

3/9/2017

0 Comments

 
Over the past couple of years one popular gift that custumers really enjoy are laser engraved wine or liquor bottles.  We have laser engraved on flat and round bottles and they have a very rich look.  Probably the time of year that we sell these the most are over the Christmas Holidays.  Individuals and big businesses alike enjoy giving them out.

A few things you need to take into consideration when lasering on bottles is the area in which the engraving is to be placed, as well as the shape of the bottle.  By far the most common are round bottles which require a rotary attachment.  The key is to make sure you have enough room on the bottle to do the engraving.  There are also flat or nearly flat bottles out there that look amazing and those don't need a rotary attachment to engrave.

When lasering on glass one thing I try to avoid are large "Bold" areas that need to be engraved.  You run into this with some logos and you run the risk of the glass becoming flaky.  Here at MBJD Laser we try to discourage our customers that want a bold logo with lots of engraving  in one spot because many times you can have issues with the outcome and the glass becoming flaky and it takes away from the beauty of the product.  Print / Wording is never a problem, because the nature of fonts have fine detail and that look outstanding.  In our experience the finer and more intricate the detail the better the laser engraved look.

With our Epilog Zing laser we used a Speed of 30 and Power of 100 on these bottles.
Picture
0 Comments

Stainless Steel Platter

3/5/2017

1 Comment

 
A large portion of what we do at MBJD Laser is  personal one of a kind gifts.  Honestly it is one of the things that makes this line of work so fun and rewarding.  New items are what keeps the job fresh and interesting.

Not to long ago we received a phone call from a customer who wanted us to put a special logo onto a stainless steel platter.  We new immediately it was something we could do so we took the job.  Like all unique jobs there are issues that need to be worked through.  The artwork that the customer supplied was not the best, in fact we had to recreate it using Photo Shop and Adobe Illustrator.  The size of the platter was also a problem.  It was just barely small enough to fit into our laser and putting a round logo onto a round platter was going to be a challenge.  Measuring and remeasuring was critical to get laid out in order to run on the laser.

Cermark was necessary to get the proper engraving.  The Cermark process is the same process we use for stainless steel tumblers.  In the end, the project came out great and the customer was very pleased. Our Epilog Zing 40 watt laser did amazing work.  We used a Speed of 20 and a Power of 100.
Picture
1 Comment

Laser Engraving on Leather

3/2/2017

0 Comments


Today at MBJD Laser we got an opportunity to try out a new leather product.  We came across a black leather bracelet product that sounded almost to good to be true.  On one black leather bracelet when it is engraved the engraving comes out Gold.  On another black leather bracelet when it is engraved it comes out Silver.  As you can imagine we were excited to give this new product a try because if it works as advertised this could lead to some very interesting products in the future.

The manufacturers laser settings for this leather on our 40 Watt Zing Laser was a Speed of 100 and a Power of 35.  As new products go, there is always a learning curve and the Laser settings always end up being tweaked slightly to find the "sweet spot".  We finally settled on a Speed of 100 and a Power of 25 when rastering.  

We were amazed at the final product.  See for yourself in the photos.  Its amazing to me that the same basic product can look so different.  It's all in how they manufacture the leather. Whatever the secret is, we are sure to use more of it and plan on using it a lot more!  Interesting note that the manufacturer even color coordinated the snaps.  :-)

Picture
Picture
0 Comments

    Brian Huber
    Owner / Operator  MBJD Laser

    Archives

    January 2022
    December 2021
    March 2019
    February 2019
    January 2019
    December 2018
    November 2018
    October 2018
    September 2018
    August 2018
    July 2018
    June 2018
    May 2018
    April 2018
    March 2018
    February 2018
    January 2018
    December 2017
    October 2017
    September 2017
    August 2017
    July 2017
    June 2017
    May 2017
    April 2017
    March 2017
    February 2017

    Categories

    All

    RSS Feed